> ## Documentation Index
> Fetch the complete documentation index at: https://docs.cnap.tech/llms.txt
> Use this file to discover all available pages before exploring further.
# Add Workers
> Connect compute capacity to your managed cluster to run applications
 After creating a managed cluster, you need to add worker nodes where your applications will run. CNAP handles all the Kubernetes setup and lifecycle management once you connect your machines.
This guide applies to **managed clusters** only. For imported clusters, worker management is handled by your cloud provider or yourself, depending on your cluster type.
**Don't want to manage servers?** CNAP can [provision and manage machines](/clusters/machines) for you. Add compute capacity from the dashboard without needing a separate cloud provider account.
**Testing locally?** Use [Multipass](/clusters/local-testing) for free local testing before buying production servers. CNAP's managed control plane can communicate with local workers via tunneling without requiring public IP addresses.
## Prerequisites
* An active managed cluster (status shows "Active" in the dashboard)
* A server or machine to connect (see supported operating systems below)
* Server meets minimum requirements: 2 CPU, 4GB RAM (4 CPU, 8GB RAM recommended for production)
## How to Add Workers
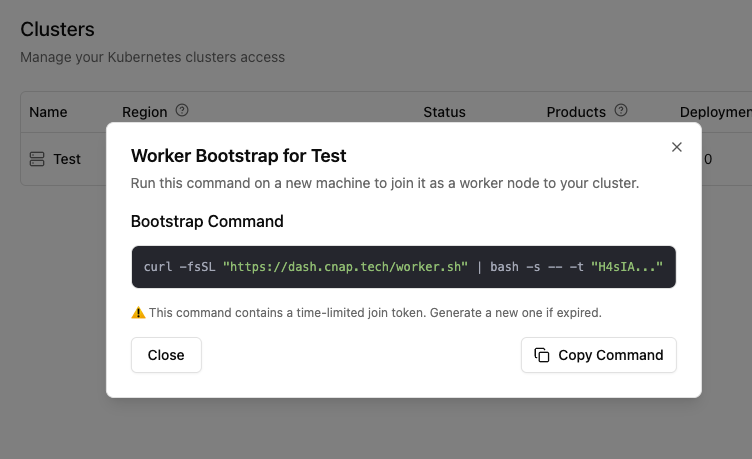
In your [clusters dashboard](https://cnap.tech/clusters), click on your cluster and find the **"Quick Actions"** section. Click **"Add a worker"** and copy the bootstrap command.
The command looks like:
```bash Bootstrap command theme={null}
curl -fsSL "https://cnap.tech/worker.sh?k0sVersion=..." | sudo bash -s -- -t "your-join-token"
```
**Join token details:** The token expires 30 minutes after generation and can be used multiple times to join multiple machines.
SSH into your server:
```bash SSH to server theme={null}
ssh root@your-server-ip
```
Then execute the bootstrap command you copied from the dashboard. The script automatically installs Kubernetes components, joins the worker to your cluster, and configures networking and security.
Your worker will appear in the dashboard within 1-2 minutes as "Active". You can now start deploying applications to your cluster!
## Automated Provisioning with Cloud-init
For fully automated worker provisioning, use **cloud-init** when creating servers on Hetzner, AWS, DigitalOcean, or any cloud provider. The server will automatically join your cluster on first boot - no SSH required.
In your cluster dashboard, click **"Add a worker"** and switch to the **"Cloud-init"** tab. Copy the configuration:
```yaml Cloud-init config theme={null}
#cloud-config
runcmd:
- curl -fsSL "https://cnap.tech/worker.sh?k0sVersion=v1.33.1-k0s.0" | bash -s -- -t "your-join-token"
```
When creating a new server in your cloud provider's dashboard:
* **Hetzner**: Paste into "Cloud config" under "Additional features"
* **AWS EC2**: Paste into "User data" under "Advanced details"
* **DigitalOcean**: Paste into "User data" under "Advanced options"
* **Vultr**: Paste into "Cloud-Init User-Data"
* **GCP**: Paste into "Automation > Startup script"
The server will automatically join your cluster within minutes of booting.
Cloud-init's `runcmd` executes once on first boot only. If you need to re-run the bootstrap (e.g., after a reset), you'll need to use the manual command method or recreate the server.
## Supported Operating Systems
CNAP workers support a wide range of Linux distributions and Windows Server:
* **Debian**: 11 (Bullseye), 12 (Bookworm)
* **Ubuntu**: 22.04 LTS or later
* **Red Hat Enterprise Linux**: 7.9, 8.10, 9.5
* **CentOS Stream**: 9, 10
* **Oracle Linux Server**: 8.9, 9.3
* **Amazon Linux**: 2023
* **Fedora**: 41 (Cloud Edition)
* **Fedora CoreOS**: Stable stream
* **Alpine Linux**: 3.19, 3.22
* **Flatcar Container Linux**
* **Windows Server**: 2019 (experimental support)
## What's Next?
Once workers are connected, you can:
Trigger deploying your product from the dashboard to your own workspace
Turn your applications into sellable products
Scale your infrastructure as demand grows
Understand how clusters work in CNAP
## Troubleshooting
* Verify the server has internet connectivity
* Check that the setup command was copied correctly
* Ensure you're running as root (with `sudo`)
* Wait 2-3 minutes for the registration process
* Check server meets minimum requirements (2 CPU, 4GB RAM)
* Ensure you're using a supported Linux distribution (see [supported operating systems](#supported-operating-systems))
* Verify no conflicting Docker/Kubernetes installations
* Verify server has outbound networking access to the control plane (outbound HTTPS connections are allowed by default, but check if behind a firewall)
CNAP's managed KaaS architecture is designed so workers don't need public IP addresses. Workers automatically create outbound connectivity tunnels to the control plane, allowing the control plane to reach the kubelet securely. This works behind firewalls, NAT, and restrictive networks.
After creating a managed cluster, you need to add worker nodes where your applications will run. CNAP handles all the Kubernetes setup and lifecycle management once you connect your machines.
This guide applies to **managed clusters** only. For imported clusters, worker management is handled by your cloud provider or yourself, depending on your cluster type.
**Don't want to manage servers?** CNAP can [provision and manage machines](/clusters/machines) for you. Add compute capacity from the dashboard without needing a separate cloud provider account.
**Testing locally?** Use [Multipass](/clusters/local-testing) for free local testing before buying production servers. CNAP's managed control plane can communicate with local workers via tunneling without requiring public IP addresses.
## Prerequisites
* An active managed cluster (status shows "Active" in the dashboard)
* A server or machine to connect (see supported operating systems below)
* Server meets minimum requirements: 2 CPU, 4GB RAM (4 CPU, 8GB RAM recommended for production)
## How to Add Workers
In your [clusters dashboard](https://cnap.tech/clusters), click on your cluster and find the **"Quick Actions"** section. Click **"Add a worker"** and copy the bootstrap command.
The command looks like:
```bash Bootstrap command theme={null}
curl -fsSL "https://cnap.tech/worker.sh?k0sVersion=..." | sudo bash -s -- -t "your-join-token"
```
**Join token details:** The token expires 30 minutes after generation and can be used multiple times to join multiple machines.
SSH into your server:
```bash SSH to server theme={null}
ssh root@your-server-ip
```
Then execute the bootstrap command you copied from the dashboard. The script automatically installs Kubernetes components, joins the worker to your cluster, and configures networking and security.
Your worker will appear in the dashboard within 1-2 minutes as "Active". You can now start deploying applications to your cluster!
## Automated Provisioning with Cloud-init
For fully automated worker provisioning, use **cloud-init** when creating servers on Hetzner, AWS, DigitalOcean, or any cloud provider. The server will automatically join your cluster on first boot - no SSH required.
In your cluster dashboard, click **"Add a worker"** and switch to the **"Cloud-init"** tab. Copy the configuration:
```yaml Cloud-init config theme={null}
#cloud-config
runcmd:
- curl -fsSL "https://cnap.tech/worker.sh?k0sVersion=v1.33.1-k0s.0" | bash -s -- -t "your-join-token"
```
When creating a new server in your cloud provider's dashboard:
* **Hetzner**: Paste into "Cloud config" under "Additional features"
* **AWS EC2**: Paste into "User data" under "Advanced details"
* **DigitalOcean**: Paste into "User data" under "Advanced options"
* **Vultr**: Paste into "Cloud-Init User-Data"
* **GCP**: Paste into "Automation > Startup script"
The server will automatically join your cluster within minutes of booting.
Cloud-init's `runcmd` executes once on first boot only. If you need to re-run the bootstrap (e.g., after a reset), you'll need to use the manual command method or recreate the server.
## Supported Operating Systems
CNAP workers support a wide range of Linux distributions and Windows Server:
* **Debian**: 11 (Bullseye), 12 (Bookworm)
* **Ubuntu**: 22.04 LTS or later
* **Red Hat Enterprise Linux**: 7.9, 8.10, 9.5
* **CentOS Stream**: 9, 10
* **Oracle Linux Server**: 8.9, 9.3
* **Amazon Linux**: 2023
* **Fedora**: 41 (Cloud Edition)
* **Fedora CoreOS**: Stable stream
* **Alpine Linux**: 3.19, 3.22
* **Flatcar Container Linux**
* **Windows Server**: 2019 (experimental support)
## What's Next?
Once workers are connected, you can:
Trigger deploying your product from the dashboard to your own workspace
Turn your applications into sellable products
Scale your infrastructure as demand grows
Understand how clusters work in CNAP
## Troubleshooting
* Verify the server has internet connectivity
* Check that the setup command was copied correctly
* Ensure you're running as root (with `sudo`)
* Wait 2-3 minutes for the registration process
* Check server meets minimum requirements (2 CPU, 4GB RAM)
* Ensure you're using a supported Linux distribution (see [supported operating systems](#supported-operating-systems))
* Verify no conflicting Docker/Kubernetes installations
* Verify server has outbound networking access to the control plane (outbound HTTPS connections are allowed by default, but check if behind a firewall)
CNAP's managed KaaS architecture is designed so workers don't need public IP addresses. Workers automatically create outbound connectivity tunnels to the control plane, allowing the control plane to reach the kubelet securely. This works behind firewalls, NAT, and restrictive networks.